


Designing a FPGA Micro Pt1 - Start The Clock
Last time I talked about state machines and micro’s inside FPGAs and why you may want to consider having a micro. So lets say you have decided you want or need a micro in your FPGA design. Where will you start? Well there are lots to pick from but one option is to design your own. So with that in mind I decided to set myself the challenge of doing just that.
Designing a micro from the ground up is something I’ve never done. I’ve used bits of other ones and tweaked them but this is different. There are a whole load of things to consider, like size, 8,16 or 32 bit. There is how will I program it or even compile the code for it. These are big steps and ones I dont think fit this site. So I have decided in this case to design a clone of a chip that is already out there.
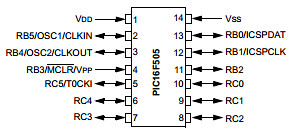
Even this is a hard choice but I decided on the microchip PIC12F509. The reason is this is a small and easy chip to understand, ideal I think for a starting point. Its 8bit and can access 1k of ROM. Has 41 RAM bytes and only 33 instructions. So the design is not going to be too difficult to follow I hope. I personally think this is a good starting point as once I have this mastered I could then understand how to go design much larger devices.
Another reason for the PIC12 is that the microchip IDE is free and will compile me a HEX file that I can later include in my FPGA design. There is also good supply of documentation on how the inside of the chip works in the datasheets. So these are my reasons and you may agree or have ones of your own.
So lets look at the details; we will need 1024, 12bit bytes as our ROM. 41, 8 bit bytes of RAM storage. That should be easy enough and can be designed in by our FPGA design tools. Next we will need ALU and some special function registers like a status register. The PIC also has program counter and a two level stack. Below shows the function block we will need and has been taken from the microchip data sheet.

To start with will ignore peripherals like the timer but we will want the GPIO or there will be no interfacing at all. We can come back and add the timer, or make a better one later! That what's good about this, we can use the main core and then add extra stuff that we want.
The instruction decoder I’m guessing may be the hardest part, getting them 33 instruction to follow the rules and do everything they would do in a real PIC. Having said that they don't look too complex so we should be fine. It should be pointed out that I don't expect the FPGA clone to run as smooth as a real PIC12 or use the same amount of gates, after all Microchip spend lots of money on these devices but maybe at the end of this I’ll have to test it side by side to a real one? No pressure then!
Now the subtitle of this post is “Start The Clock” and that's because a core depends on its clock. In the case of the PIC12F its not what you might expect. The main clock is divided into four internal clocks called Q1,2,3 & 4. These are non overlapping clocks which from the keen eyed amongst you will see this is a 4 bit shift register! You will see from below that the Fetch cycle uses all these four clock periods as to will the execute phase of the CPU. So before writing other code for our code the clock is the first part that needs doing.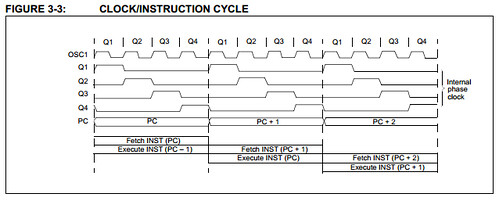
So in this post I have not looked at detail and the reason was because I want to set the stage so to speak and look at what needs designing. We now know what chip to clone, the core structure inside it and that gives us a opportunity to get started. So for my next post I’ll start writing the code and will make it all available for you to look at. So till then I will be intrested in you views of what I have planed and what chip if any you would have picked as your starting point?


- Comments
- Write a Comment Select to add a comment
To post reply to a comment, click on the 'reply' button attached to each comment. To post a new comment (not a reply to a comment) check out the 'Write a Comment' tab at the top of the comments.
Please login (on the right) if you already have an account on this platform.
Otherwise, please use this form to register (free) an join one of the largest online community for Electrical/Embedded/DSP/FPGA/ML engineers: