


binary hello world
Python + Ohio + MyHDL + FPGA
Recently I had the opportunity to coordinate a hands-on programmable hardware (FPGA) workshop (open-space) at a regional Python conference - @pyohio. The workshop was for those that had little to no exposure to programmable hardware. For this situation I used two basic examples: two versions of a binary hello world.
The binary hello world -- blinking an LED -- is a good starting point to introduce programmable hardware, hardware descriptions languages, and the vendor FPGA tool flow. In this case, the FPGA tool flow was simplified with a collection of Python scripts.
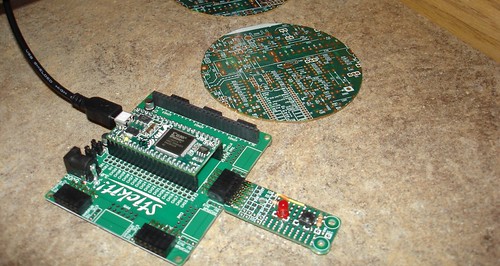
The complete source is available on a bitbucket repository. Feel free to grab the examples and try them out. The FPGA development boards used were Xess Xula boards. Dave Vandenbout was gracious to loan a set of boards for the workshop.
The boards are very flexible for prototyping and experimenting. We used a prototype PMOD with a button and an LED.
Button Push'n
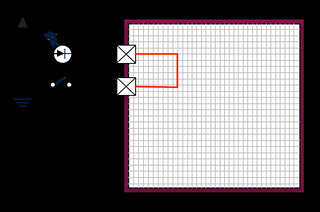
The first example was a module that simply wired the button to the LED. When the button is pressed the LED is turned off.
Compiling the example was as simple as:
>> python compile_button_led.py
This would convert, synthesize, map, place-n-route, and generate the bit stream. After the bit stream was created configuring the FPGA was as simple as:
>> xsload.py --fpga xilinx/ise/button_led/xula.bit
To compile the design the Xilinx webpack software is required. See the tools install page for additional instructions to load the packages and tools.
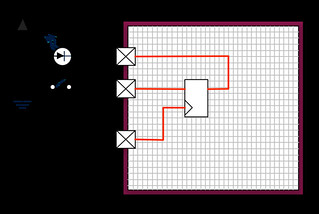
The first example had two variants. The first, wire the pins together and the second, placed a flip-flop (1-bit register) in between the button and LED. The second variant was merely to introduce a register and the HDL syntax. These two variants provided minimalistic modules for the attendees to experiment with.
More Blinking
The second example was slightly more involved. It changed the LED blink rate when the button was pressed. The HDL needed to debounce the button (only one rate change per press) and then increase the blink rate.
Again, compiling the design (once the tools are all installed) is as simple as:
>> python compile_user_io.py
And load the same as above.
Journey into Programmable Hardware
These minimal examples are good starting points for anyones journey into the world of programmable hardware. If you have a board with a push-button and an LED try out the examples. Experiment with the LED blink rates: how fast, duty cycle (the amount of time on versus the amount of time off), random patterns, etc.
What's Next
See the following pages for additions exmaples and links.
- Comments
- Write a Comment Select to add a comment
I'll be doing some reading on this. Any support for the Virtex-2 and its built in PPC cores?

To post reply to a comment, click on the 'reply' button attached to each comment. To post a new comment (not a reply to a comment) check out the 'Write a Comment' tab at the top of the comments.
Please login (on the right) if you already have an account on this platform.
Otherwise, please use this form to register (free) an join one of the largest online community for Electrical/Embedded/DSP/FPGA/ML engineers: